Previous Topic "Schedule Setup Form (Trigger)"
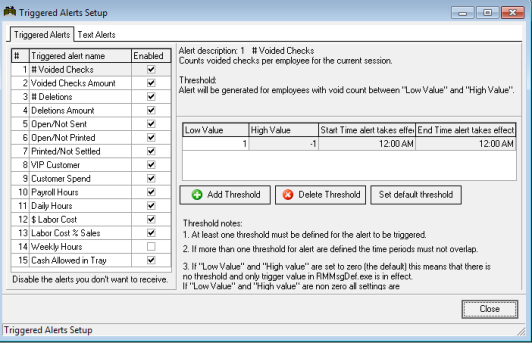
You can add additional filter settings for RM Alerts in the RM BackOffice Module. You will need to access the Alerts setup form by opening the RM BackOffice > Setup > General > Alerts > Computed Alerts Tab. Both BackOffice Alerts & RMMSGDEF need to be setup. When processing the alert first the value in RM BackOffice alert trigger is checked, then the value in RMMSGDEF. So, an alert must pass both thresholds to be fired.
The left side of the form lists the pre-configured computed alerts and the associated numbers. The rest of form is divided by the filter settings in the upper right portion and a note section in the bottom right portion. The notes section is static and is only viewable when selecting the trigger type. In other words, information typed in this field will not appear anywhere else. Triggers can be enabled or disabled using the "Enabled" field setting.
The filter section is separated into four columns. Additional filter rows can be added using the "Add Threshold" button directly below the filter section. Use the first two columns to configure the tracking parameters. For example, you can enter “2” in the low column and “99” in the high column for # of Deletions. An alert will be triggered beginning at the 2nd deletion. The first deletion will not trigger an alert nor will any deletion over 100. The system will register all deletions when a “1” is entered in the low column and a negative “1’ is entered in the high column.
You can also place time parameters on triggers. If the start and end time are the same, the data in the low/high columns will take precedence. For this reason, same start and ending times are preferred for most trigger types except for two: $ Labor Cost and Labor Costs % of Sales. Both these trigger types are normally computed on an hourly interval. If tracking either two of these triggers types, you will need to add rows and configure different start and end times for each row. In the screen shot below, we have set up filters to trigger an alert anytime labor dollars go above $100 for an hour time slot.
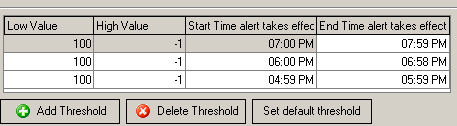
The 100 in the low column is the threshold to trigger the alert for the given time slot. We have placed a (-1) in the high column since we are more interested in the low column threshold. We have also set up time slots for just the time periods we were interested in.
Triggered Alerts-The Trigger Setup section under the Schedule tab has two fields: Trigger type and Value. Click on the “type” drop down menu to select a preconfigured trigger type. The trigger types are as follows:
# Voided Checks- You can set a trigger based the number of voided checks produced at the POS system using the “Void” method of payment.
Voided Check Amounts- trigger an alert based on dollar amount of “Voids” using the “Void” method of payment
# of Deletions- triggers alert based on the number of deletions on a guest check using the “delete” function at the POS or WO unit.
Deletion Amounts- this option will trigger an alert based on dollar amount of deletions.
Open/Not sent- use this option to trigger an alert based on the time where a table remains inactive after being opened.
Printed/Not Settled- you can create a trigger based upon the time difference when a table remains inactive after being printed.
VIP Customer- You can create a trigger alerting you when a customer comes in and spends a large amount of money. An alert will be generated if a check is open for a customer already present in the "Customer Database". The Customer Loyalty program is required.
Customer Spend- use this trigger to send an alert based upon dollars spent on an order. This field calculates per customer. Example: field is set to trigger at $40. A table has 4 customers; the alert will be triggered when $160 is spent.
Payroll Hours- You can set a trigger based upon hours worked in a week based on parameters setup in Payroll Options (RM BackOffice > Activities> Payroll Options). This trigger is use to report overtime alerts. The Payroll Hours report calculates hours for the current payroll period, as determined by Start and End date fields in Payroll options (pay_start and pay_end field columns found in Config.dbf in the rmwin directory). See the example below when a fourteen day pay period is used.
Daily Hours- You can set a trigger based upon hours worked for a current login date. You can use this trigger for overtime alerts.
$ Labor Costs- Set a trigger based on labor dollars for an hour time period. Hour adjustments must be made in the RM BackOffice > Setup >Alerts > $ Labor Costs.
Labor Cost % Sales- set a trigger based on labor dollars divided by sales. This is an hourly setting that must be configured in the RM BackOffice > Setup > Alerts > Labor Cost % Sales.
Weekly Hours- Use this field to set a trigger based upon hours worked in a week. This trigger is use to report overtime alerts Weekly hours, however, always report from the current day back to 12:01a.m. of the same day of the week as pay_start field column found in Config.dbf in the rmwin directory and configured in RM Backoffice > Activities> Payroll Options .
You can add configurable messages under the Text Alerts tab. The alert messages defined under this tab are for POS to WO handheld units only. You can add a message simply by clicking on the "Add text alert" button on the form and type the text under the “Alert Message” column.

Next Topic "Email Reports (RM Reports)"